Tracking conversion rates across the various steps of your GTM processes is fundamental to understanding the health of your business. It helps us understand how prospects and customers flow through your funnel, identify areas for improvement, measure performance after a change (and compare it to a baseline), and more. But setting this up and maintaining it in Salesforce is difficult and time-consuming.
But don’t worry, Sweep is here to help!
In this blog post, I will guide you through the steps of creating a Conversion dashboard that will enable you to track your funnel performance directly in Salesforce, with and without using Sweep. Whether you're a seasoned sales professional or a newcomer to the Salesforce ecosystem, I'm confident you'll find this valuable.
Let's get started!
Conversion Dashboards in Salesforce
We've found that tracking conversion rates between every stage of your business process is a great way to start improving it. This could mean tracking progress from one opportunity stage to another, lead status, account stages, or any other object you use to manage your business process.
The end result of what we are looking to build in Salesforce will look like this:
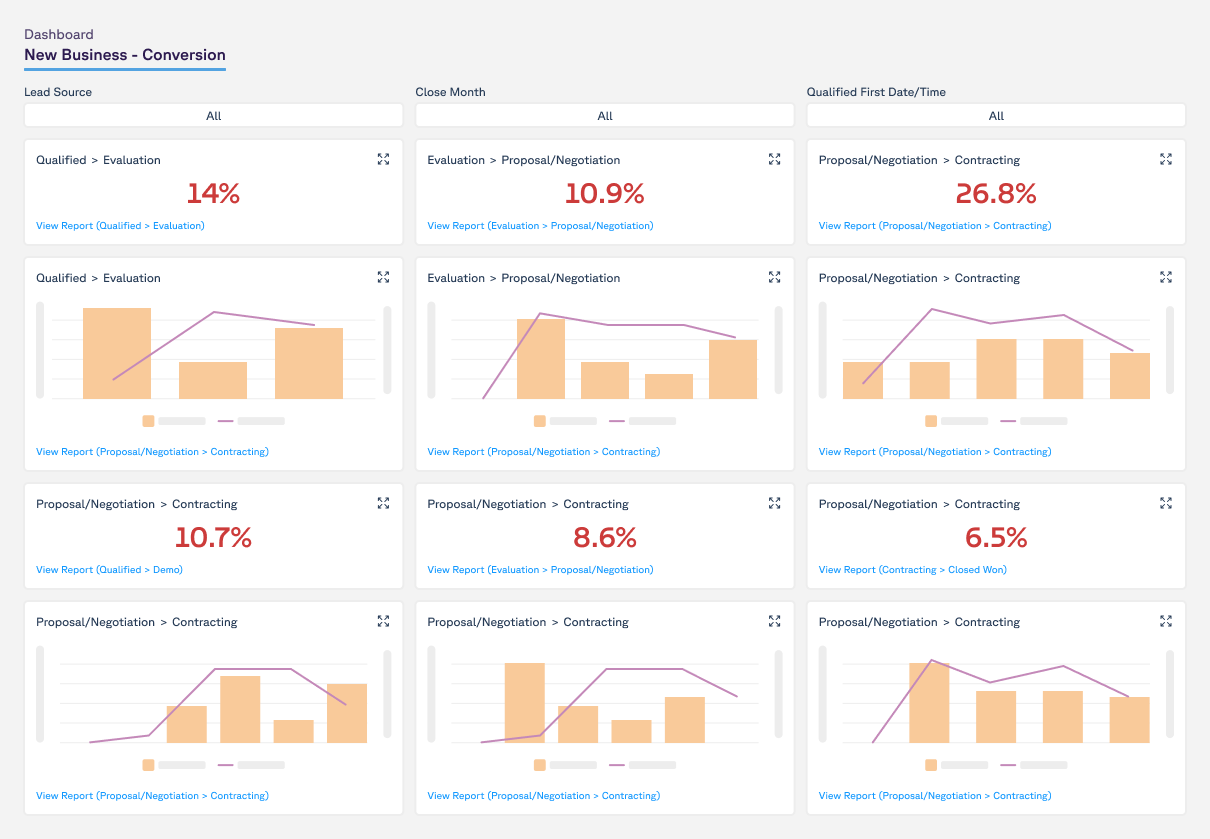
I recommend creating a dashboard for every business process separately as a start (we will discuss an overall business overview dashboard in one of our future posts). This dashboard should include the following metrics:
- Conversion rate from one step to the next
- By-month cohorts showing changes in conversion rates by when the records entered the first step
- Filters to allow you to filter the entire dashboard by record created date, entry into the funnel or anything else you find critical for your business.
How to create a Conversion Dashboard in Salesforce for the Opportunity Object
Step 1: Set up time-stamping
- In this blog post, Benjamin Zeitz outlines how to set up time stamping to track the first time a record entered a certain stage, last time the record entered this stage, and total stage duration. This involves creating custom fields and automations in Salesforce, or if you are using Sweep, enabling the Time-stamping feature for your funnel.
Step 2: Create reports for each stage conversion
- Create a report for each set of stages in your funnel that shows the conversion rate between them. For example, create a report that shows the conversion rate between Qualified and Evaluation. Each report should include the relevant time stamping fields, as well as any other relevant data you want to filter according to, such as lead source. Each report should group records by the stage and time period (in this case, it's monthly).
Step 3: Add conversion rate columns
- Add summary columns to each report that calculate the total number of opportunities that entered and exited each stage during the specified time period. Then add a third column to calculate the conversion rate between the two stages.
Step 4: Create a dashboard
- Create a new dashboard and add each of your reports as a component. Arrange the components in a way that makes sense for your funnel, such as from top to bottom in the order of the stages.
Step 5: Add monthly cohort widget per stage
- Customize your dashboard to show the conversion rates for each stage over time. Add a graph that displays the conversion rates for each stage, or use a table to show the conversion rates for each stage by month or week.
Step 6: Add filters to your dashboard
- Add filters to your dashboard to be able to filter the entire dashboard by record creation date, lead source or any other field that exists in all the reports and relevant to your business.
Your dashboard is ready! QA it first and don't forget to share it with the relevant stakeholders in your company.
Maintenance
- As great as the initial dashboard looks now, remember that every change to your opportunity stages will require adjusting the time stamping mechanism you built and the dashboard itself - like adding new stages, rearranging existing ones, etc.
Using Sweep to Create Conversion Dashboards in Salesforce
One of the recent features I worked on at Sweep is the Reporting Packages. Sweep Reporting Packages make it easy to create and maintain Salesforce dashboards without having to manually create the underlying reports, reporting formulas, and dashboard layout.
Here’s a short video I created to show you how to activate it through Sweep and the end result in Salesforce -
Here's how it works
- Navigate to Reporting Packages in Sweep.
- Click on Conversion Rates to open a preview of the package.
- Click Activate to create the underlying reports and dashboards for all your business processes in Salesforce (for any Salesforce object).
- Share the link to your dashboards with your team so they can start using them right away!
Here are a few things I'm excited about with Sweep Reporting Packages
- Sweep automatically creates timestamp fields for each step in your funnel, so you don't have to do it manually.
- Sweep automatically creates reports and dashboards according to your funnels and steps, and organizes the dashboard accordingly.
- When your process changes, Sweep automatically updates your dashboards to reflect the changes.
It's that easy!
To try out Sweep's Reporting Package with Salesforce funnels, feel free to schedule a walkthrough with our team.
If you have any questions, please don't hesitate to reach out to me at gabriellez@sweep.io. I'd be happy to help you set up the perfect Salesforce reporting for your business process.

